Import images into the photo database
Preparation - Import
The demo database of fotoARRAY should not be used for your own images. It is not stored at a location which we recommend to store valuable user data. (Read more)
In order for fotoARRAY to manage the digital images, the files must first be imported into the image database. This is done by the Image Import. Call it up by selecting the appropriate menu item.
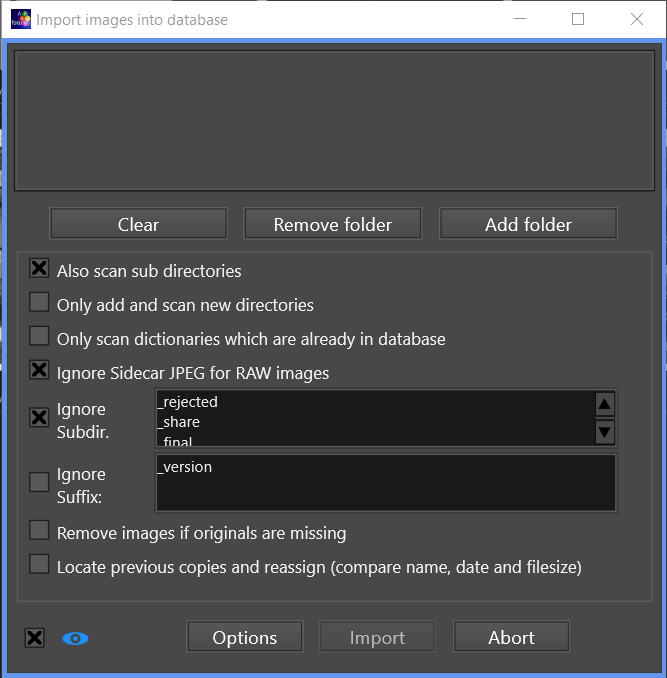
In the import dialog you can enter a list of directories in the upper area. You can enter several directories at once. The dialog also allows to select if subdirectories should be searched automatically. If you use this function, please make sure that you do not search directories that contain a lot of subdirectories. The operation could otherwise take a long time, especially if you have specified the root directory, for example.
If you want to import the images from an iPhoto archive, or the archive of a similar software, then it is better to select only the directory of the main images in this archive. Often the name of this directory is "Masters".
The import dialog is also opened when you drag the directories to be imported from a file manager to the main window of fotoARRAY. This is often the faster way.
In the import dialog you can further specify that the subdirectories "_preview" and "_final" are ignored. This setting is recommended.
Furthermore, you can specify that only directories that have already been added to the photo database are searched. This is useful if you have added more images to these directories.
On the other hand, it is often useful to search only new directories. If the corresponding check box is activated, then only new directories are searched, starting from the selected directories, and then these are searched together with their subdirectories.
Another option allows you to mark images that can no longer be found in a directory as deleted. They can still be found in the recycle bin if their root directory still exists.
Another option activates a special mode of import, which first searches the found images in the database and, if found, sets their path to that of the respective found image. This function is useful if the paths in an image archive have changed for some images. Please note that this function slows down the import a lot.
When the import is started, the progress is displayed in the main window. All directories that are currently being processed are listed. Depending on the computer used, several directories are being processed at the same time; their names are then displayed in blue. If a directory was completely searched, it is indicated how many images were added or removed. At the end of the entire process, all changes are transferred to the database. By programming this function using all CPU cores of your computer, the import function of fotoARRAY usually runs very fast.
The import dialog can also be called from the context menu of the directory view. Here there is an entry for synchronization which causes the selected directories to be automatically entered as source directories for the import.
Sometimes it happens that the image path of an image, or even of several image directories, changes after the import. For example, when you connect an external hard drive to the computer, a drive letter is assigned. But this drive letter can change, among other things, if you also use other external drives. In fotoARRAY it is easy to change the content of a node in the directory view. So you can easily change the drive letter. The dialog for the change is opened from the popup dialog of the directories.
![]()
With this change it is not checked whether it comes so to the multiple naming of the same directories. This is not important for the function of the database, but the synchronization of a duplicate directory must be avoided. Since no reorganization of the database takes place, it is possible to change the name at any time.
 If the check box is selected some of the imported images will be displayed in the progress dialog.
Create a backup of the images on your hard disk
Please make sure that you have at least one copy of the original images on a hard drive that is not permanently connected to your computer. For this purpose you can use the command line command robocopy under Windows.
robocopy e:\mypictures f:\mypictures /E /S /D will copy the images from the directory e:\mypictures to the hard disk F. If the disk E has become too small, you can continue to work with the disk that was registered as F. (With the Disk Management - right click on the Windows menu - you can assign the letter E: to the disk as soon as the older disk is no longer connected).
Attention: robocopy is able to synchronize directories. This will delete images in the source directory if not found in the destination. So use the parameter /MIR with care, if at all.